

If your main water shutoff valve won’t turn, try a short low-force sequence first: relieve pressure, apply penetrating oil, and rock the handle gently. Stop immediately if the handle spins without changing water flow, or if you notice new leaks or hissing. If the sequence doesn’t work, contact your water utility about the curb stop or call a professional at (440) 253-0332.
TL;DR:
- Before applying force, open faucets on the highest and lowest floors, then apply silicone or PTFE penetrating oil and wait 20 to 30 minutes.
- Rock the handle in small increments and check faucet flow; stop if it spins freely without changing flow or a new leak appears.
- If the valve fails, contact the water utility rather than operating the curb stop yourself; service may be limited to working hours or carry a fee.
- Older corroded gate valves may need replacement; plumbers often recommend ball valves that turn 90 degrees and pressure test the system after repairs.
Table of Contents
- Why main shut-off valves seize in the first place
- A safe sequence homeowners can try to free a stuck main valve
- What to avoid: common DIY mistakes that damage valves
- Signs your valve has already failed internally
- Finding the meter valve, the curb stop, and working with your utility
- When to call a professional and what that visit typically involves
- A publisher’s note on seized valves and safety
- Getting help from Tri-County Services Electric & Plumbing
- FAQ
- Sources
Why main shut-off valves seize in the first place
A main shutoff valve that won’t budge usually isn’t broken, at least not yet. It’s seized, and three forces are almost always responsible: mineral scale, corrosion, and plain disuse.
Hard water leaves mineral deposits inside the valve body every time water passes through, and those deposits build up fastest around parts that never move. Most homeowners only touch their main valve during an emergency or a renovation, so it can sit untouched for years. That inactivity lets scale harden around the stem and gate, essentially gluing the moving parts to the valve body.
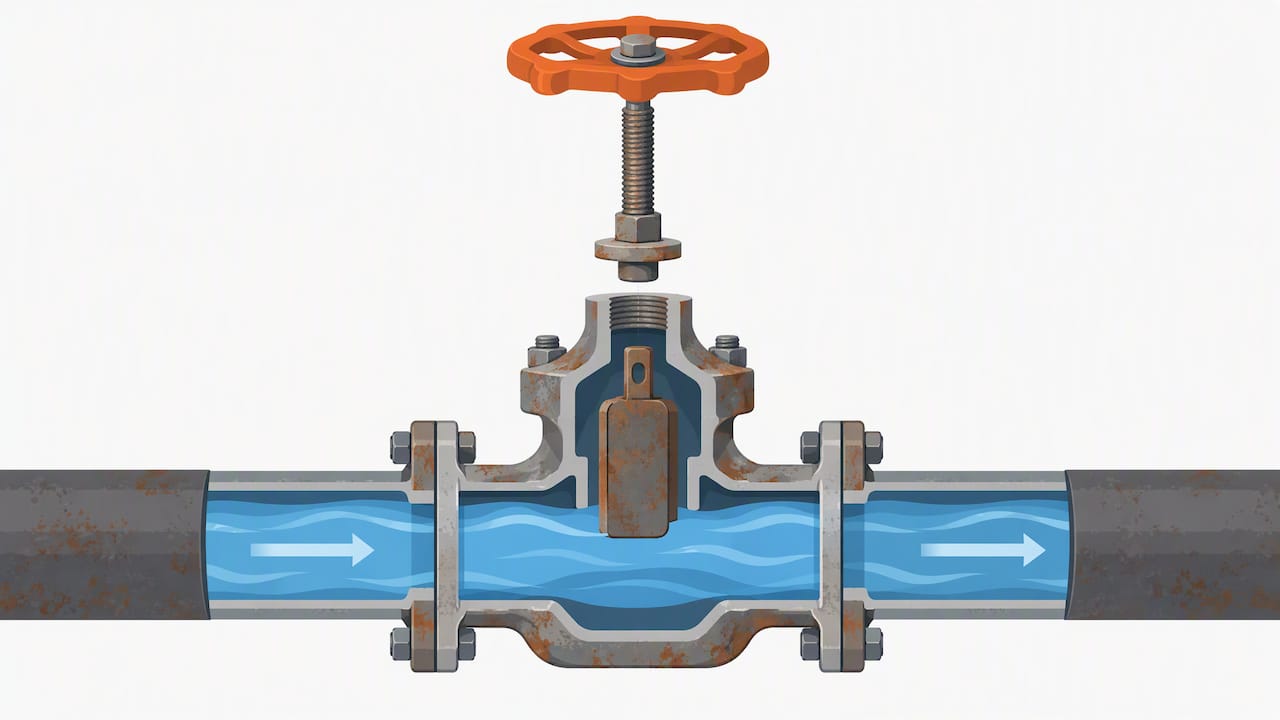
The type of valve matters too. Older homes often have gate valves, which close by turning a wheel-style handle that drives a flat gate down into the water path through a threaded stem. That threaded stem has a lot of surface area where mineral deposits and corrosion can grab hold, which is why gate valves fail more often than newer quarter-turn ball valves. A ball valve uses a lever handle that rotates a perforated ball 90 degrees, with far fewer places for scale to accumulate and a more reliable seal over time.

You can often spot trouble before you ever try to turn the handle. Look for a chalky white or greenish crust around the valve body, which signals mineral buildup or a slow leak that’s been evaporating and leaving deposits behind. Dampness at the base of the valve, discoloration on nearby pipe, or a faint drip are all signs that corrosion may already be compromising the valve’s internal seals, not just its exterior finish.
A safe sequence homeowners can try to free a stuck main valve
Before touching the valve itself, locate your main shutoff and confirm it’s the one that controls your whole house. Then relieve pressure in the line by opening one faucet on the highest floor of your home and one on the lowest. Municipal guidance on main valve operation notes that forcing a valve under full pressure raises the risk of internal breakage, so draining some of that pressure first lowers the force needed and reduces the chance of a sudden spray if something gives way suddenly.
- Open a high faucet and a low faucet to relieve line pressure before touching the valve handle.
- Apply a penetrating oil, such as a silicone-based or PTFE lubricant, directly to the exposed stem where it meets the valve body.
- Let the oil sit for 20 to 30 minutes so it can work into the threads.
- Rock the handle gently back and forth in small increments rather than forcing it in one direction.
- If the valve has a packing nut just behind the handle, loosen it slightly to free up the stem, then retighten it once the handle moves to prevent a new leak.
A few additional notes make this process safer:
- A hair dryer on low heat held a few inches from the valve body can help loosen stubborn mineral deposits without risking damage to nearby pipes or fittings.
- Never apply direct flame or a heat gun to a valve, since sudden extreme heat can crack metal that’s already weakened by corrosion.
- After each small movement, check whether water flow at a faucet actually changes. A handle that moves but produces no change in flow is a warning sign, not progress.
Pro Tip: Turn the handle just a few degrees at a time and recheck a faucet after each attempt. Slow, incremental movement is far less likely to snap a corroded stem than one firm twist.
If you’ve gone through this sequence once, applied oil, waited, and tried gentle rocking without any real movement or change in flow, that’s the point to stop. Repeated force on a valve that isn’t responding tends to make the underlying problem worse rather than better, and this is exactly the kind of job where a professional’s experience matters more than persistence.
What to avoid: common DIY mistakes that damage valves
A stuck valve creates a strong temptation to add leverage, but that instinct causes more emergency calls than the stuck valve itself.
- Don’t slip a pipe wrench or a cheater bar onto the handle for extra torque. Gate valve stems and bodies are often brass or cast iron that’s been weakened by years of corrosion, and added leverage commonly cracks the valve body or snaps the stem clean off, turning a slow valve into a valve that can’t close at all.
- Don’t use a torch or any open flame to try to loosen corrosion. The heat can warp seals, damage nearby pipe insulation, or ignite debris in a wall cavity. Gentle heat from a hair dryer is a reasonable substitute; a torch is not.
- Don’t attempt to operate the curb stop, the valve near the street that connects your home to the main water line, with makeshift tools. That valve is usually owned and controlled by your water utility, and improvised operation can damage equipment that isn’t yours to fix.
Each of these mistakes shares a common thread: they trade a small amount of effort now for a much larger repair later, often turning a seized valve into a valve that needs full replacement under less convenient, more urgent circumstances.
Signs your valve has already failed internally
Sometimes the problem isn’t that the valve is stuck. It’s that it’s already broken, and continuing to force it only makes things worse.
The clearest warning sign is a handle that spins freely but produces no change in water flow at your faucets. That usually means the internal gate or stem has separated from the mechanism that’s supposed to move it, a failure that happens most often in older gate valves whose threaded stems have corroded from the inside out. A valve in that condition can’t be fixed by more rocking or more oil; it needs to be replaced.
Other signs point toward compromised seals rather than full separation. New drips appearing at the stem after you’ve worked on the valve, a hissing sound when water is running elsewhere in the house, or visible seepage and fresh mineral crust around the valve body all suggest the internal seals are failing even if the handle itself still turns normally.
Age works against gate valves in particular. If your home is several decades old and the main valve has never been serviced, repeated attempts to free it may buy a little time, but replacement with a more durable valve is usually the more reliable long-term fix rather than fighting the same corrosion every few years.
Finding the meter valve, the curb stop, and working with your utility
When the main valve inside your home won’t cooperate, the next shutoff point upstream is usually the meter valve, located where your water line enters the house near the meter, or the curb stop, a separate valve typically buried near the property line between your house and the street.
- The meter valve sits close to the water meter itself, often in a basement, crawl space, or utility closet, and is usually accessible without special tools.
- The curb stop sits underground near the curb or sidewalk and generally requires a long-handled key, often called a curb key, to operate.
- Many municipal water providers maintain that the curb stop is utility-owned infrastructure, and guidance from the City of Lincoln’s water utility advises against customers operating it themselves, since doing so with the wrong tool can damage the valve or the line.
- Some utilities will dispatch a crew to shut off service at the curb stop in an emergency rather than asking homeowners to handle it directly.
When you call your utility, be ready to describe what you’re seeing: whether water is actively leaking, where the leak or symptom is located, and whether you’ve already tried the safe sequence on your main valve. Guidance from the City of Fresno’s water division notes that if a customer can’t shut off their own supply, the utility can perform the shutoff, though scheduling may be limited to working hours and could carry a service fee. Utility policy documents also tend to remind property owners that they’re responsible for keeping meter valves accessible and tested occasionally, precisely so this kind of emergency doesn’t catch anyone off guard, a point echoed in utility customer rights and responsibilities guidance.
When to call a professional and what that visit typically involves
If your main valve won’t stop the flow, if you’re seeing any new leaks, or if you can’t safely reach an upstream shutoff, that’s the point to stop troubleshooting and call for help rather than attempt a temporary fix on your own. For homeowners who want a sense of what counts as urgent before making that call, it helps to review what actually qualifies as a plumbing emergency.
A professional visit for a stuck or failed main valve generally follows a predictable path:
- Isolate the water supply safely, often at the meter valve or with coordination with the utility if the curb stop needs to be involved.
- Diagnose whether the valve is simply seized by corrosion or has actually failed internally, since the fix is different for each.
- Pressure-test the system after any repair to confirm there are no new leaks at the valve or surrounding fittings.
- Replace an aging gate valve with a quarter-turn ball valve when repeated freezing or corrosion makes a durable long-term fix the better option.
Costs for this kind of work vary with the valve type, accessibility, and local code requirements, so it’s worth asking for a specific estimate rather than assuming a number. Some jurisdictions also require a permit for valve replacement on the main line, which a professional visit will typically account for as part of the quote.
Pro Tip: Keep a note of when you last successfully turned your main valve. If you can’t remember doing it in the last year or two, that’s a reasonable prompt to have it tested before an actual emergency forces the issue.
For guidance on what to check before making that call, including basic visual checks that are safe to do yourself, see our rundown of what to check before calling a plumber. If you’re already past that point and dealing with active leaking, this overview of emergency leak repairs explains what a same-day visit usually covers. For general interim precautions while you wait for help, a homeowner’s guide to temporary leak fixes covers reasonable stopgap measures without encouraging further force on a seized valve.
A publisher’s note on seized valves and safety
We have seen the same pattern play out again and again: a homeowner finds a stuck main valve, applies a little extra force, and turns a minor inconvenience into a cracked valve body and an active leak.
That’s why we lean toward recommending replacement over repeated freeing attempts on older gate valves, especially once corrosion has set in. A quarter-turn ball valve installed now is a more dependable shutoff than a decades-old gate valve that might work today and fail the next time you actually need it in an emergency. Safety and minimal disruption guide how we approach every visit.
If your valve doesn’t move, or you’re not sure whether it’s safe to keep trying, call us at (440) 253-0332.
— Lindsay Paramore
Getting help from Tri-County Services Electric & Plumbing

When a main valve won’t cooperate, we bring the tools and experience to isolate your water supply safely and figure out exactly what’s wrong, whether that’s surface corrosion or an internal failure that needs a new valve altogether. Our plumbing services cover the full range this kind of job requires, from diagnosing a stuck shutoff to full valve and water-line repair.
- We assess the valve on site to determine whether it can be freed safely or needs replacement.
- We isolate your water supply at the safest available point, whether that’s the meter valve or in coordination with your utility.
- We recommend a fix, often a quarter-turn ball valve for long-term reliability, and walk you through scheduling before any work begins.
Call (440) 253-0332 to get on our schedule, or check our plumbing pricing guide for a sense of typical costs before you call. For related water-line work, our water line installation and repair page covers what else we handle beyond the shutoff valve itself.
FAQ
Can you spray WD-40 on a water shutoff valve?
WD-40 isn’t the ideal choice for a main water valve since it’s a general-purpose lubricant rather than a penetrating oil built for rusted metal threads. A silicone-based or PTFE penetrating lubricant applied to the exposed stem, followed by wait time, tends to work more reliably on corroded valve threads.
Why won’t my main water valve shut off?
A main valve usually resists closing because of mineral scale or corrosion that’s built up around the stem and gate from years of inactivity. In some cases the handle will turn but the internal gate or stem has already separated, which means the valve has failed and needs replacement rather than more force.
What is the best lubricant for a water shutoff valve?
A silicone-based or PTFE penetrating lubricant applied directly to the exposed stem works well for loosening mineral deposits and light corrosion. Avoid household oils not designed for penetrating rusted metal, and give the lubricant time to work into the threads before attempting to move the handle.
Who is responsible for the main water shutoff valve?
Property owners are generally responsible for the plumbing from the water meter into the home, including the main shutoff valve inside the house, while the utility typically maintains the curb stop and meter equipment. Municipal guidance from the City of Lincoln notes that homeowners should contact the utility rather than attempt to operate the curb stop themselves.
Sources
The municipal and utility guidance below informed the safety steps and responsibility boundaries described in this article, including who typically owns which valve and how utilities handle emergency shutoff requests. A HomeAdvisor listing excerpt from our team at Tri-County Services Electric & Plumbing also informed the professional perspective on when DIY attempts should give way to a service call.
- LWS Frequently Asked Questions – City of Lincoln, NE
- Property Owners and Contractors – City of Fresno
- Rights and Responsibilities of Residential Customers (utility policy document)